【 tulaoshi.com - Illustrator 】
在学习中遇到问题可以到 Illustrator版块 发贴交流!
上一节:Illustrator 8.0基础入门教程(七)
下一节:Illustrator 8.0基础入门教程(九)
在当今的设计中越来越重视文字的设计,一个好的文字设计会让整个设计增色不少。Illustrator作为世界一流的矢量绘图软件,自然可以让我们设计出漂亮的文字。金属光泽的文字在设计中经常使用。下图设计的金属文字漂亮吧?想不想学学怎么做?

首先用工具栏中的文字工具

输入Illustrator这个单词。然后在Type菜单中选择Creat outline将文字图形化,这样才能对文字进行进一步的编辑。图形化后我们可以看到图形化的文字上出现了一些可编辑的节点。我们就可以下一步的操作了。

选择Object菜单Path子菜单中的Offset Path命令。
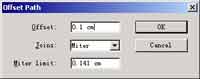
在Offset中根据文字的大小输入恰当的数值。本例子中我用的是72磅的字Offset输入的是0.1cm。Joins选择Miter,Miter Limit输入0.141cm。一切设置好以后按下OK,文字外就多了一圈外线。如图

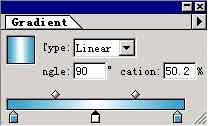
现在我们选中外线,然后在Gradient浮动面板中编辑出两端白色中间蓝色的渐变。在Type中选择linear(线状渐变),Engle(角度)为90度。
然后用我们在工具箱的色彩中中选择我们编辑好的渐变色。

这时外线图形就被蓝色的渐变色填充。

完成这一部操作以后为了方便以后的操作我们要将它锁定。要锁定外线图形我们可以使用两种方法。第一种比较直接。选中外线图形(我们可以按住Shift依次点选图形,这样我们就可以选中全部要选的图形),然后在Object菜单中选择Lock,这时选择的图形就被锁定了。第二种方法是使用图层对图形进行锁定。先在图层面板上按下

新建一个图层
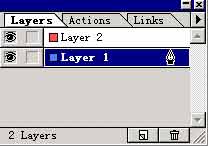
然后选中外线图形我们发现在layer1的右边的钢笔图形的旁边多了一个小方块

(眼睛不好的要仔细看哟)我们用鼠标将这个小方块拖动到layer2上,这时外线图形变成了层的颜色红色(也就是layer2左边的方块的颜色)。由于layer2在layer1的上面这时外线的图形就会遮住文字,我们就将layer2用鼠标拖动到layer1下面。
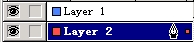
现在用鼠标单击第二个方框

锁定layer2,选择layer1层编辑,就可以放心大胆的编辑图形了。现在使用工具箱中的knife tool ,将文字图形一分为二。分的时候注意,如果你按直线分开在使用knif tool

的时候请按住Alt键,这样分割线就是直线。

现在用在渐变色调色板(Gradient)上调出起点蓝色终点白色的渐变色。选中被分割开的下半部分的图形,然后用调好的渐变色填充它。上半部用百色填充。最后将文字图形的线条颜色去掉。

这样就大功告成了。