【 tulaoshi.com - PS 】
来源:网络 作者:杨斌
立方体是非常常见的图形,如何做出一个立方体,还需要一定的美学知识。如怎么透视及设置光源等。这些事制作立体图形的重点所在。掌握好了,我们就可以快速做出真实的立体图形。
最终效果

1、按下键盘上的Ctrl+N组合键,或执行菜单栏上的“文件→新建”命令,打开“新建”对话框,设置参照下图所示。

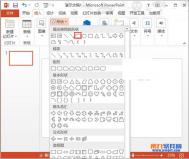
2、选择“直线工具”(快捷键U),在选项栏上设置该工具,如下图所示。

3、新建图层,命名为“结构线”,用“直线工具”根据前面所介绍的“透视”构图原理绘制立方体的结构线,如下图所示。

4、用“矩形选框工具”创建一个矩形选区,如下图所示。

5、执行菜单栏上的“选择→变换选区”命令,或右击文档窗口,在快捷菜单中选择“变换选区”命令,自由变换该矩形选区。按下Ctrl键不放,可以自由拖动控制点;同时按下Ctrl+Shift键不放,可以垂直拖动控制点。参照结构线,将控制点拖拽到合适位置,如下图所示。

(本文来源于图老师网站,更多请访问http://www.tulaoshi.com/ps/)

6、新建图层,在选区内填充明度较高的灰色(颜色接近即可),如下图所示。

7、新建图层,按上面方法绘制右侧的矩形选区。设置前景色和背景色分别为深灰色和白色,选择“渐变工具”, 在选项栏上设置该工具,如下图所示。

8、自选区左上角向右下角创建渐变,如下图所示。

(本文来源于图老师网站,更多请访问http://www.tulaoshi.com/ps/)9、进一步完善顶部的面,如下图所示。

10、下面,我们将立方体处理得更真实些。选择“减淡工具”,按下图所示设置该工具在选项栏上的选项。

11、用“减淡工具”分别涂抹3个图层,不要过于均匀,这样效果才更真实,注意刻画“三TuLaoShi.com面五调”的效果,如下图所示。

12、用“加深工具”将右侧图层图形边缘,也就是明暗交界部加深,如下图所示。

13、在背景层上新建图层,命名为“投影”。用“多边形套索工具”绘制如下图所示选区。

14、按下键盘上的Ctrl+D组合键,或执行菜单栏上的“选择→羽化”命令,打开“羽化选区”对话框,将选区羽化5个像素,如下图所示。

15、设置前景色为“深灰色”(色彩相近即可),按下键盘上的Alt+BackSpace组合键,在选区内填充前景色,如下图所示。

16、最后,取消选区,用笔触“硬度”较低的、“主直径”较大的(“硬度”和“主直径”的设置方法是,右击文档窗口,在弹出的调板中调整,如下图所示。)较低的“橡皮擦工具”(快捷键 E)将“投影”的相应部分擦淡,立方体的绘制就完成了。

最终效果: