【 tulaoshi.com - PS 】
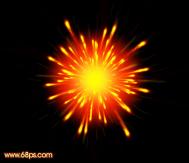
最终效果

(本文来源于图老师网站,更多请访问http://www.tulaoshi.com/ps/) 1、新建一个文件,设置前景色为黑色,填充背景图层,效果如图1所示。

图1
2、选择工具箱中的“画笔工具”,在属性栏中设置画笔大小为20,不透明度为100%,打开画笔面板选择“形状动态”选项,设置参数如图2所示,其他动态设置如图3所示。

图2

图3
3、设置前景色为白色。在图层面板中新建图层1,利用画笔工具绘制一条白线,如图4所示。

图4
4、复制图层1为图层1副本。选择图层1,执行菜单栏中的“编辑”→“自由变换”命令,将自由变换框的中心点向下移动并把自由变换框逆时针旋转30度,效果如图5所示。

图5
5、再次复制图层1,选择移动工具,在执行菜单栏中的“编辑”→“变换”→“再次”命令,复制白线的同时再次变换角度,添加第三条白线,效果如图6所示。

图6
6、添加第三条白线 6、用同样的方法添加更多的www.Tulaoshi.com白色线条,效果如图7所示。

(本文来源于图老师网站,更多请访问http://www.tulaoshi.com/ps/)图7
7、在图层面板中将烟花所在的所有图层进行链接,然后按Ctrl+E键合并链接图层为图层1。
8、在图层面板中,将图层1复制生成图层1副本,将图层1隐藏。执行菜单栏中的“滤镜”→“模糊”→“高斯模糊”命令,在弹出的对话框中,设置半径为7像素,如图08所示,图像效果如图9所示。

图8

图9
9、双击图层1副本,打开图层样式对话框,选择“渐变叠加”样式,设置参数如图10所示,图像效果如图11所示。

图10

图11
10、取消图层1的隐藏,效果如图12所示。复制图层1副本为图层1副本2,图像效果如图13所示。

图13
11、新建图层2。按住Ctrl键单击图层1,将烟花的图案载入选区,效果如图14所示。

图14
12、执行菜单栏中的“选择”→“修改”→“收缩”命令,设置参数如图15所示,图像效果如图16所示。

图15

图16
13、执行菜单栏中的“选择”→“羽化”命令,设置参数如图17所示。

图17
14、为选区填充白色,图像效果如图18所示。

图18
接着执行菜单栏中的“滤镜”→“模糊”→“高斯模糊”命令,在弹出的对话框中,设置半径为2,如图19所示。

图19
15、为图层1添加图层蒙版,设置前景色为黑色,选择工具箱中的渐变工具,选择从前景到透明渐变,设置类型为径向渐变,由烟花的中间向外侧拖到,图像效果如图20所示。

图20
16、将烟花所在层合并为图层1,复制图层1为图层1副本,隐藏图层1副本,将图层1的不透明度设置为70%,图像效果如图21所示。

图21
17、显示图层1副本,执行菜单栏中的“图像”→“调整”→“去色”命令,效果如图22所示。

图22
接着执行菜单栏中的“滤镜”→“模糊”→“高斯模糊”命令,设置参数如图23所示,缩小后图像效果如图24所示。

图23

图24
18、按Ctrl+U键打开色相/饱和度对话框,设置参数如图25所示,图像效果如图26所示。

图25

图26
19、在复制出各种大小和明暗都不同的烟花,效果如图27所示,选择一幅背景,最终效果如图28所示。

图27
(本文来源于图老师网站,更多请访问http://www.tulaoshi.com/ps/)图28