【 tulaoshi.com - PS 】
本教程简要讲解一般图片合成的技巧,需要把握好整体的颜色,融合的接口需要非常自然。
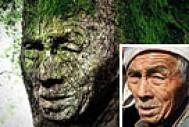
最终效果

(本文来源于图老师网站,更多请访问http://www.tulaoshi.com/ps/) 素材1

素材2

1.打开素材1 tulaoshi.com

(本文来源于图老师网站,更多请访问http://www.tulaoshi.com/ps/) 2.打开素材2把人物抠出来拉到素材1的上面,调出图层样式设置投影和斜面和浮雕,参数自己把握

3.按Ctrl 点图层调出人物的选区,先建一层选择菜单:编辑 描边,选用绿色

4.用套索工具选中人物衣服部分按Ctrl + Shift + D 羽化数值为3,回到背景图层按Ctrl + J 复制出来,然后按Ctrl + Shift + ] 把图层移到最上面,按Ctrl + U调色相和饱和度,使其颜色与树皮接近。

5.再背景图层用魔术棒选择树叶复制放到人物身上调节好颜色完成最终效果。