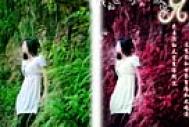
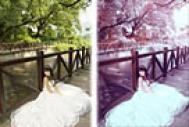
下面是个简单易学的PS渐变制作梦幻的紫红色建筑图片效果教程教程,图老师小编详细图解介绍包你轻松学会,喜欢的朋友赶紧get起来吧!
【 tulaoshi.com - PS 】
来源:数字魔方 作者:数字魔方翻译
 (本文来源于图老师网站,更多请访问http://www.tulaoshi.com/ps/)(本文来源于图老师网站,更多请访问http://www.tulaoshi.com/ps/)1、选择渐变工具,选择渐变里的默认渐变如图,修改该渐变中间和右边颜色设置,中间为#ff0054右边为#fffdcd。


 (本文来源于图老师网站,更多请访问http://www.tulaoshi.com/ps/)(本文来源于图老师网站,更多请访问http://www.tulaoshi.com/ps/)2、选择更改径向渐变,模式为滤色,以及90%的不透明度。
 (本文来源于图老师网站,更多请访问http://www.tulaoshi.com/ps/)(本文来源于图老师网站,更多请访问http://www.tulaoshi.com/ps/)5、设置样式为线性,角度为125,规模为100%,并勾选反向。

 (本文来源于图老师网站,更多请访问http://www.tulaoshi.com/ps/)(本文来源于图老师网站,更多请访问http://www.tulaoshi.com/ps/)8、使用相同的梯度变化,但预设颜色为黑色。 设置为线型,角度-60,规模为100%,并勾选反向按钮。


 (本文来源于图老师网站,更多请访问http://www.tulaoshi.com/ps/)(本文来源于图老师网站,更多请访问http://www.tulaoshi.com/ps/)11、更换镜头光晕的混合模式为滤色。重复镜头光晕层,以加强它。

来源:http://www.tulaoshi.com/n/20160318/1893064.html
看过《PS渐变制作梦幻的紫红色建筑图片效果教程》的人还看了以下文章 更多>>