【 tulaoshi.com - PS 】
来源: 作者:山鹰
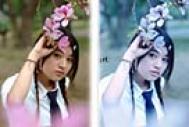
本教程不仅介绍图片调色及人物简单美化的方法,同时也介绍了一些图片装饰的方法。如下面的教程,作者特意把画面中加上了鸽子,彩虹,文字等。这些虽然简单,不过有了这些画面会显得更有内涵。
原图

最终效果

1、拷贝背景图层,执行“应用图像”命令提亮图像暗部。对话框中的模式为滤色,不透明度30%,点蒙版控制混合范围。

2、添加图层蒙版,把人物过曝处用黑色画笔在图层蒙版缩览图中涂抹。

3、新建一个图层,按Ctrl + Alt + Shift + E盖印图层。

4、创建“色阶”调整图层调整图像。


5、新建一个图层,盖印图层。执行“替换颜色”命令调整天空的蓝色。


(本文来源于图老师网站,更多请访问http://www.tulaoshi.com/ps/)6、曲线调整图像。压点暗部。

7、盖印图层,执行“应用图像”命令提亮图像(对话框中的混合模式为滤色,不透明度30%)。修改图层混合模式为柔光,添加图层蒙版,涂抹出过曝的人物区域。

8、盖印图层,执行“表面模糊”滤镜。添加图层蒙版,涂抹出前景及人物不需模糊的区域。修改图层不透明度为80%。


9、新建一个图层,盖印图层。

10、曲线调整图像,调整红通道。使其天空出现从蓝色到青色的过渡。

(本文来源于图老师网站,更多请访问http://www.tulaoshi.com/ps/)

11、盖印图层。使用套索工具选取人物下肢,羽化2像素。执行“色阶”命令调整下肢的肤色。


12、打开下图所示的素材。把白鸽抠出来,自由变换命令调整图像大小和方向。


13、执行色彩平衡命令调整白鸽图像。使其与背景色协调。创建剪贴蒙版。


14、新建一文件。

15、找到“透明彩虹”渐变条。

16、从上往下拉一彩虹渐变。

17、自由变换,点右键,垂直翻转。


18、执行:滤镜 扭曲 极坐标滤镜。


19、拖入做好的彩虹文件,自由变换命令变换其大小和方向。橡皮擦工具擦拭两头不需要的部分。图层混合模式为滤色,执行高斯模糊。不透明度为60%。

20、拖Tulaoshi.Com入文安素材,执行“投影”图层样式。

21、盖印图层,执行“应用图像”命令,模式为“柔光”,不透明度30%。

22、创建“可选”调整图层调调整人物肤色。


23、新建一个图层,盖印图层,执行:滤镜 锐化 USM锐化,参数设置如下图,确定后完成最终效果。

最终效果: