Photoshop制作透明和不透明汽泡教程
1、 首先分析一下气泡的形式,在卡通形式中其实气泡是分为两种的,一种是不透明的,而另一种是透明的,在此,我们简单的制作一下。
效果图:
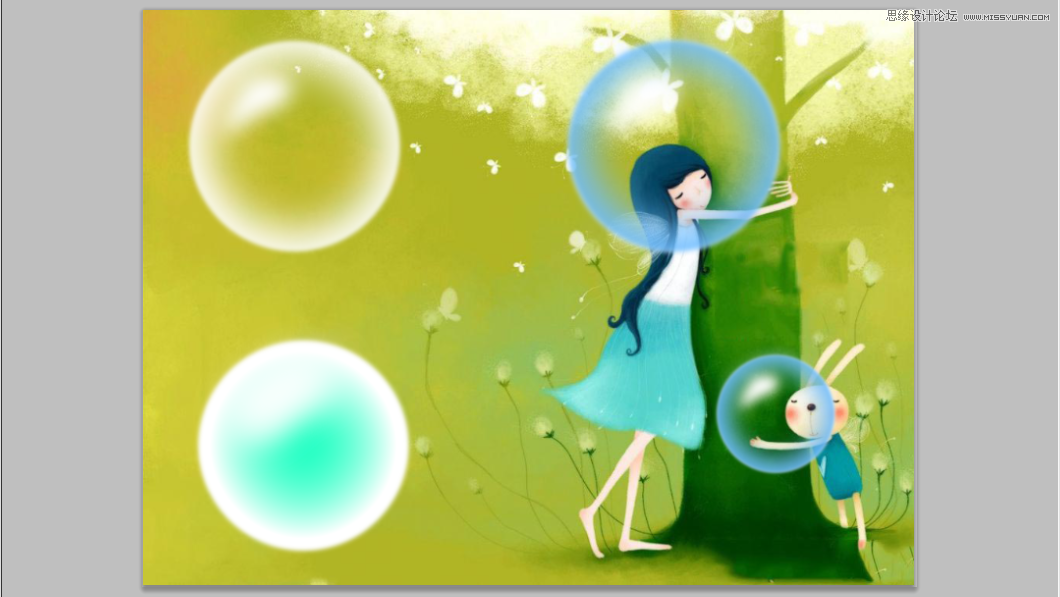
2、不透明气泡:
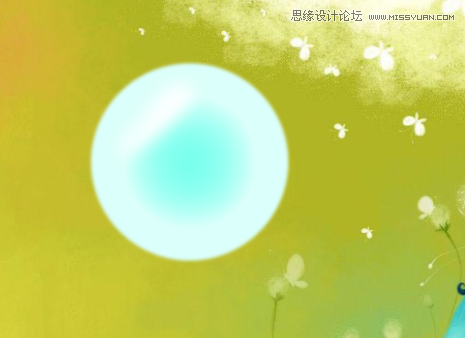
打开背景层后先新建一个图层(图层一);选择椭圆选区工具,摁住shift键画出一个正圆,填充你想要的颜色(白色除外),
如图:
![Phot...<a href="http://www.tulaoshi.com/n/20160216/1567735.html" target="_blank">[ 查看全文 ]</a></p>
<div class="img_yyy_2">
<span>2016-02-16</span>
<i>标签:</i>
<div class="yyy_2_a"><a href="http://www.tulaoshi.com/ps/" target="_blank">PS</a> <a href="http://www.tulaoshi.com/psjichu/" target="_blank">PS基础</a></div>
</div>
</div>
</div>
</div>
<div class="xiangguan_gg xiangguan_reader clearfix">
<div class="xiang_892_1" style="width:1158px;">
<h3><a href="http://www.tulaoshi.com/n/20160216/1567735.html" target="_blank">Photoshop制作透明和不透明汽泡教程</a>的相关文章</h3>
</div>
<div class="xiang_892_2" style="width:1158px;">
<ul id="loadmore_container" style="width:1158px;">
<li>
<div class="xiang_892_2_1"><a href="/reader/168325" target="_blank"><img src="http://img.tulaoshi.com/201505/18/top201505181149436232_thumb_189.jpg" width="224" height="173"></a></div>
<div class="xiang_right clearfix">
<div class="xiang_right_1"><A href="http://www.tulaoshi.com/n/20150422/168325.html" target="_blank">PS教程:图层不透明度</A></div>
<div class="xiang_righ_lable">标签:<a href="http://www.tulaoshi.com/ps/" target="_blank">PS</a> <a href="http://www.tulaoshi.com/psjichu/" target="_blank">PS基础</a> <a href="http://www.tulaoshi.com/pskoutu/" target="_blank">PS抠图</a> <a href="http://www.tulaoshi.com/diaose/" target="_blank">PS调色</a> <a href="http://www.tulaoshi.com/psxg/" target="_blank">PS效果</a></div>
<div class="span_em_123"> 除了改变位置和层次以外,图层一个很重要的特性就是可以设定不透明度。降低不透明度后图层中的像素会呈现出半透明的效果,这有利于进行图层之间的混合处理。 按下〖TAB〗隐藏所有调板,然后使用【视图 屏幕模式 全屏模式】〖按两次F〗将Photoshop切换到一种没有调板没有菜单没有窗口的显示方式。这种方式可以为操作留下最大的屏幕空间。 OK,现在在不借助图层调板的前提下完成以下操作:改变一个眼睛...<a href="http://www.tulaoshi.com/n/20150422/168325.html" target="_blank">[ 查看全文 ]</a></div>
<div class="span_em ">
<div class="cai_list_font"><a href="/user/feiquanping/" target="_blank"><img src="http://static.tulaoshi.com/html/tulaoshi_new/images/touxiang/25.jpg" /><span>feiquanping</span></a></div>
<span class="font_span"><a class="em_s" href="javascript:;">81</a><a class="em_s2" href="javascript:;">1</a></span></div>
</div>
</li>
<li>
<div class="xiang_892_2_1"><a href="/reader/1483412" target="_blank"><img src="http://img.tulaoshi.com/201601/29/85d85a95a190d5aa19124888e9293453_thumb_189.jpg" width="224" height="173"></a></div>
<div class="xiang_right clearfix">
<div class="xiang_right_1"><A href="http://www.tulaoshi.com/n/20160129/1483412.html" target="_blank">AutoCAD渲染教程:如何制作透明与不透明图像文件</A></div>
<div class="xiang_righ_lable">标签:<a href="http://www.tulaoshi.com/autocad/" target="_blank">autocad教程</a></div>
<div class="span_em_123"> 本文由 中国 dengdinghui 原创,转载请保留此信息! 在学习中遇到问题请到 论坛CAD版块 发贴交流! 本系列AutoCAD三维建模教程由中国AutoCAD版块为对AutoCAD三维建模感兴趣的朋友整理制作的,是专为刚开始接触AutoCAD三维的朋友定身打造的。本教程由浅入深,循序渐进,通过对大量练习题及实例的绘制步骤讲解、各个三维命令的使用介绍,将喜爱AutoCAD三维建模及渲染的朋友带进...<a href="http://www.tulaoshi.com/n/20160129/1483412.html" target="_blank">[ 查看全文 ]</a></div>
<div class="span_em ">
<div class="cai_list_font"><a href="/user/nice缘来1234/" target="_blank"><img src="http://static.tulaoshi.com/html/tulaoshi_new/images/touxiang/2.jpg" /><span>nice缘来1234</span></a></div>
<span class="font_span"><a class="em_s" href="javascript:;">79</a><a class="em_s2" href="javascript:;">1</a></span></div>
</div>
</li>
<li>
<div class="xiang_892_2_1"><a href="/reader/1518109" target="_blank"><img src="http://img.tulaoshi.com/201601/30/108b99d9131f5f3b8fde824d6d6f9fd5_thumb_189.jpg" width="224" height="173"></a></div>
<div class="xiang_right clearfix">
<div class="xiang_right_1"><A href="http://www.tulaoshi.com/n/20160130/1518109.html" target="_blank">Photoshop逆转不透明度-超级去水印</A></div>
<div class="xiang_righ_lable">标签:<a href="http://www.tulaoshi.com/ps/" target="_blank">PS</a> <a href="http://www.tulaoshi.com/psjiaocheng/" target="_blank">PS教程</a></div>
<div class="span_em_123"> 如下图,我们要做的就是上面半透明的一层(大且复杂的一个水印)去掉,还原底图的原貌。(注:下面图层的运算实际上是RGB值的运算) 这好比我们从一个地方走到另外一个地方,需要返回,最安全可靠的方法就是沿原路走回去。先看看我们是怎么走过来的!不透明度混合原理:覆盖图层以X%的不透明度和底图混合,得到的混合图等于覆盖图层乘以X%再加上底图乘以(1-X%)。 如何走回去就不言自明:底图...<a href="http://www.tulaoshi.com/n/20160130/1518109.html" target="_blank">[ 查看全文 ]</a></div>
<div class="span_em ">
<div class="cai_list_font"><a href="/user/冰淇淋唯爱2ne1/" target="_blank"><img src="http://static.tulaoshi.com/html/tulaoshi_new/images/touxiang/19.jpg" /><span>冰淇淋唯爱2ne1</span></a></div>
<span class="font_span"><a class="em_s" href="javascript:;">6</a><a class="em_s2" href="javascript:;">1</a></span></div>
</div>
</li>
<li>
<div class="xiang_892_2_1"><a href="/reader/168344" target="_blank"><img src="http://img.tulaoshi.com/201504/22/9a27bc91d9f3070233955975e7541002_thumb_189.jpg" width="224" height="173"></a></div>
<div class="xiang_right clearfix">
<div class="xiang_right_1"><A href="http://www.tulaoshi.com/n/20150422/168344.html" target="_blank">PS教程:论选区的不透明度</A></div>
<div class="xiang_righ_lable">标签:<a href="http://www.tulaoshi.com/ps/" target="_blank">PS</a> <a href="http://www.tulaoshi.com/psjichu/" target="_blank">PS基础</a> <a href="http://www.tulaoshi.com/pskoutu/" target="_blank">PS抠图</a></div>
<div class="span_em_123"> 学习进行到这里,可能大家会有疑问:通道中白色代表已选区,黑色代表未选区,那么其他颜色又代表什么呢? 在前面课程中我们已经学过,通道中没有类似红色绿色这样的彩色,只包含灰度。除了白色和黑色以外,其他的都是介于白色与黑色之间的过渡色。我们还学习过,在单独的RGB通道灰度图中,白色代表完全发光,黑色代表完全不发光,换句话说白色代表的是一种全饱和的状态,黑色则代表一种完全没有的状态...<a href="http://www.tulaoshi.com/n/20150422/168344.html" target="_blank">[ 查看全文 ]</a></div>
<div class="span_em ">
<div class="cai_list_font"><a href="/user/莎莎大小姐3/" target="_blank"><img src="http://static.tulaoshi.com/html/tulaoshi_new/images/touxiang/14.jpg" /><span>莎莎大小姐3</span></a></div>
<span class="font_span"><a class="em_s" href="javascript:;">83</a><a class="em_s2" href="javascript:;">1</a></span></div>
</div>
</li>
<li>
<div class="xiang_892_2_1"><a href="/reader/1565627" target="_blank"><img src="http://img.tulaoshi.com/201602/16/cca26827ee1192200adab2b7506a09d7_thumb_189.jpg" width="224" height="173"></a></div>
<div class="xiang_right clearfix">
<div class="xiang_right_1"><A href="http://www.tulaoshi.com/n/20160216/1565627.html" target="_blank">Photoshop解析笔刷流量和不透明度的区别</A></div>
<div class="xiang_righ_lable">标签:<a href="http://www.tulaoshi.com/ps/" target="_blank">PS</a> <a href="http://www.tulaoshi.com/psjichu/" target="_blank">PS基础</a></div>
<div class="span_em_123"> 近日,有人问我:PS画笔里面,流量和不透明度的区别到底在哪里,这个问题挺有意思的,然后我到网上搜了一下,讲得五花八门,云里雾里的。有的讲得是很正确的,但太抽象了。今天,我就这个问题展开一下。 相关技巧教程推荐: Photoshop详细详细解析色彩模式和调色原理 Photoshop实例解析蒙版工具的使用技巧 Photoshop技巧教程:轻松掌握PS曲线工具 Photoshop制作清晰的透明PNG图片的方法和技巧 ...<a href="http://www.tulaoshi.com/n/20160216/1565627.html" target="_blank">[ 查看全文 ]</a></div>
<div class="span_em ">
<div class="cai_list_font"><a href="/user/陈筱刚/" target="_blank"><img src="http://static.tulaoshi.com/html/tulaoshi_new/images/touxiang/17.jpg" /><span>陈筱刚</span></a></div>
<span class="font_span"><a class="em_s" href="javascript:;">0</a><a class="em_s2" href="javascript:;">1</a></span></div>
</div>
</li>
<li>
<div class="xiang_892_2_1"><a href="/reader/1563571" target="_blank"><img src="http://img.tulaoshi.com/201602/15/264ceb8c38d0abeee47db1b02b654c0f_thumb_189.jpg" width="224" height="173"></a></div>
<div class="xiang_right clearfix">
<div class="xiang_right_1"><A href="http://www.tulaoshi.com/n/20160215/1563571.html" target="_blank">Photoshop图层不透明度和填充度的区别实例讲解</A></div>
<div class="xiang_righ_lable">标签:<a href="http://www.tulaoshi.com/ps/" target="_blank">PS</a> <a href="http://www.tulaoshi.com/psjichu/" target="_blank">PS基础</a></div>
<div class="span_em_123"> 我收到过许多学习Photoshop用户问到的很多最普通的问题,其中的一个就是图层面板上不透明度和填充这两个选项究竟有什么不同? 难道它们不是做着同样的事情吗?这个问题问得好,因为在大多数情况下它们的功能的确是一样的。这两个选项都是控制当前图层的透明度。它们是控制当前被选中的这个图层能允许其下面的图层所显示的程度。通常情况下,要降低一个图层的透明度,我们就减少它的不透明度的百分比。 然而...<a href="http://www.tulaoshi.com/n/20160215/1563571.html" target="_blank">[ 查看全文 ]</a></div>
<div class="span_em ">
<div class="cai_list_font"><a href="/user/英豪者/" target="_blank"><img src="http://static.tulaoshi.com/html/tulaoshi_new/images/touxiang/1.jpg" /><span>英豪者</span></a></div>
<span class="font_span"><a class="em_s" href="javascript:;">12</a><a class="em_s2" href="javascript:;">1</a></span></div>
</div>
</li>
<li>
<div class="xiang_892_2_1"><a href="/reader/1519042" target="_blank"><img src="http://img.tulaoshi.com/201601/30/f9bb4224e7e01428a78b9ce41bfe7d03_thumb_189.jpg" width="224" height="173"></a></div>
<div class="xiang_right clearfix">
<div class="xiang_right_1"><A href="http://www.tulaoshi.com/n/20160130/1519042.html" target="_blank">Photoshop妙手回春之术-逆转不透明度</A></div>
<div class="xiang_righ_lable">标签:<a href="http://www.tulaoshi.com/ps/" target="_blank">PS</a> <a href="http://www.tulaoshi.com/psjiaocheng/" target="_blank">PS教程</a></div>
<div class="span_em_123"> 我前两天产生这个想法的时候向人提到过,被斥之为痴心妄想 ,差点放弃! 如下图,我们要做的就是上面半透明的一层(大且复杂的一个水印)去掉,还原底图的原貌。(注:下面图层的运算实际上是RGB值的运算) 这好比我们从一个地方走到另外一个地方,需要返回,最安全可靠的方法就是沿原路走回去。先看看我们是怎么走过来的!不透明度混合原理:覆盖图层以X%的不透明度和底图混合,得...<a href="http://www.tulaoshi.com/n/20160130/1519042.html" target="_blank">[ 查看全文 ]</a></div>
<div class="span_em ">
<div class="cai_list_font"><a href="/user/社会人张大哥/" target="_blank"><img src="http://static.tulaoshi.com/html/tulaoshi_new/images/touxiang/22.jpg" /><span>社会人张大哥</span></a></div>
<span class="font_span"><a class="em_s" href="javascript:;">0</a><a class="em_s2" href="javascript:;">1</a></span></div>
</div>
</li>
<li>
<div class="xiang_892_2_1"><a href="/reader/1564499" target="_blank"><img src="http://img.tulaoshi.com/201602/15/1f2320130b06a816a40c2759b0b98892_thumb_189.jpg" width="224" height="173"></a></div>
<div class="xiang_right clearfix">
<div class="xiang_right_1"><A href="http://www.tulaoshi.com/n/20160215/1564499.html" target="_blank">Photoshop制作透明效果的玻璃字体教程</A></div>
<div class="xiang_righ_lable">标签:<a href="http://www.tulaoshi.com/ps/" target="_blank">PS</a> <a href="http://www.tulaoshi.com/psjichu/" target="_blank">PS基础</a></div>
<div class="span_em_123"> 看下完成效果 1.图层样式很重要,第一步渐变叠加效果 2.第二步内发光 3.斜角什么玩意的效果 4.做下投影效果,注意角度和距离 5.叠加一层骚蓝色,调整下图层样式 6.收拾下细节 <a href="http://www.tulaoshi.com/n/20160215/1564499.html" target="_blank">[ 查看全文 ]</a></div>
<div class="span_em ">
<div class="cai_list_font"><a href="/user/丶消逝的眼眸/" target="_blank"><img src="http://static.tulaoshi.com/html/tulaoshi_new/images/touxiang/29.jpg" /><span>丶消逝的眼眸</span></a></div>
<span class="font_span"><a class="em_s" href="javascript:;">19</a><a class="em_s2" href="javascript:;">1</a></span></div>
</div>
</li>
<li>
<div class="xiang_892_2_1"><a href="/reader/1524431" target="_blank"><img src="http://img.tulaoshi.com/201601/31/07a97b1feb75b424f9bb3e392ceb0541_thumb_189.jpg" width="224" height="173"></a></div>
<div class="xiang_right clearfix">
<div class="xiang_right_1"><A href="http://www.tulaoshi.com/n/20160131/1524431.html" target="_blank">Photoshop制作半透明塑胶文字</A></div>
<div class="xiang_righ_lable">标签:<a href="http://www.tulaoshi.com/psxg/" target="_blank">PS效果</a> <a href="http://www.tulaoshi.com/ps/" target="_blank">PS</a> <a href="http://www.tulaoshi.com/psjichu/" target="_blank">PS基础</a></div>
<div class="span_em_123"> 本教程简单介绍塑料风格文字的制作方法。制作的时候全部都是用图层样式来设置质感和颜色,具体的数值需要根据字体的实际大小坐适当的变化。 最终效果 1、我们用文字工具用任意一种颜色一种字体打上自己需要的文字。 2、我们用图层混合选项中的“渐变叠加”,会出来一个窗口,双击“黑白渐变”就会出来,很多颜色渐变的选择窗口,我们选择“黄橙渐变色”~~~渐变方向可以自由选择。 3、我们再用...<a href="http://www.tulaoshi.com/n/20160131/1524431.html" target="_blank">[ 查看全文 ]</a></div>
<div class="span_em ">
<div class="cai_list_font"><a href="/user/坟里面的少年lx/" target="_blank"><img src="http://static.tulaoshi.com/html/tulaoshi_new/images/touxiang/11.jpg" /><span>坟里面的少年lx</span></a></div>
<span class="font_span"><a class="em_s" href="javascript:;">28</a><a class="em_s2" href="javascript:;">1</a></span></div>
</div>
</li>
<li>
<div class="xiang_892_2_1"><a href="/reader/1532582" target="_blank"><img src="http://img.tulaoshi.com/201602/02/59fe4be142803c47a65985d0fd3dd554_thumb_189.jpg" width="224" height="173"></a></div>
<div class="xiang_right clearfix">
<div class="xiang_right_1"><A href="http://www.tulaoshi.com/n/20160202/1532582.html" target="_blank">Photoshop制作透明的水人</A></div>
<div class="span_em_123"> 本教程介绍把实物处理成透明水质的特效制作。思路:先把实物部分抠出来,去色再加点滤镜效果,然后再调成接近水的颜色。然后再使用水珠等素材叠加。本教程的文字说明有点简单很多参数都没有列出来。制作的时候只能去把握作者的思路。 原图 最终效果 1.复制一层,调成黑白,给通道扣出来 2.填加调节层,曲线调节 3.复制一层,扣个通道,执行菜单:滤镜 艺术效果 塑料包装 4.给个调节...<a href="http://www.tulaoshi.com/n/20160202/1532582.html" target="_blank">[ 查看全文 ]</a></div>
<div class="span_em ">
<div class="cai_list_font"><a href="/user/孙悟能哥/" target="_blank"><img src="http://static.tulaoshi.com/html/tulaoshi_new/images/touxiang/2.jpg" /><span>孙悟能哥</span></a></div>
<span class="font_span"><a class="em_s" href="javascript:;">21</a><a class="em_s2" href="javascript:;">1</a></span></div>
</div>
</li>
<li>
<div class="xiang_892_2_1"><a href="/reader/1567713" target="_blank"><img src="http://img.tulaoshi.com/201602/16/f8c5ac1c21f3721faeea307504085ba4_thumb_189.jpg" width="224" height="173"></a></div>
<div class="xiang_right clearfix">
<div class="xiang_right_1"><A href="http://www.tulaoshi.com/n/20160216/1567713.html" target="_blank">Photoshop制作蓝色梦幻透明艺术字教程</A></div>
<div class="xiang_righ_lable">标签:<a href="http://www.tulaoshi.com/ps/" target="_blank">PS</a> <a href="http://www.tulaoshi.com/psjichu/" target="_blank">PS基础</a></div>
<div class="span_em_123"> 先来看看制作出的最终效果: 下面是具体的制作步骤: 一、新建一个1900*1200的文档,复制图层,填充黑色,添加图层样式,设置渐变叠加的数值如图1. 图1 新建图层画一个矩形,颜色无所谓,填充归零,添加图层样式,数值如下图,其中渐变设置为中灰密度。 图2 图3 二、新建文字图层,输入自己想要的文字,调整好文字大小,填充归零,然后新建图层样式,对外发光、斜面和浮雕、光泽进行调...<a href="http://www.tulaoshi.com/n/20160216/1567713.html" target="_blank">[ 查看全文 ]</a></div>
<div class="span_em ">
<div class="cai_list_font"><a href="/user/麦收时的遐想/" target="_blank"><img src="http://static.tulaoshi.com/html/tulaoshi_new/images/touxiang/3.jpg" /><span>麦收时的遐想</span></a></div>
<span class="font_span"><a class="em_s" href="javascript:;">11</a><a class="em_s2" href="javascript:;">1</a></span></div>
</div>
</li>
<li>
<div class="xiang_892_2_1"><a href="/reader/1533461" target="_blank"><img src="http://img.tulaoshi.com/201602/02/8ea5a54a2dce14c9c90cfcbc3829003c_thumb_189.jpg" width="224" height="173"></a></div>
<div class="xiang_right clearfix">
<div class="xiang_right_1"><A href="http://www.tulaoshi.com/n/20160202/1533461.html" target="_blank">Photoshop制作精致的透明玻璃按钮</A></div>
<div class="xiang_righ_lable">标签:<a href="http://www.tulaoshi.com/ps/" target="_blank">PS</a> <a href="http://www.tulaoshi.com/psjichu/" target="_blank">PS基础</a> <a href="http://www.tulaoshi.com/psxg/" target="_blank">PS效果</a></div>
<div class="span_em_123"> 作者寄语:本教程教大家制作一款简单又美观的玻璃按钮,不用任何图层样式就可以做出非常漂亮的效果。用最简单的方法制作最漂亮的作品。 最终效果 新建一个400 * 250像素的文档,背景填充蓝色:#106D98。 1、新建一个图层,命名为“玻璃边框”,选择矩形工具,半径设置为25,然后拉出下图所示的选区并填充白色。填色后不要取消选区。 2、把当前图层复制一层,得到图层副本,隐...<a href="http://www.tulaoshi.com/n/20160202/1533461.html" target="_blank">[ 查看全文 ]</a></div>
<div class="span_em ">
<div class="cai_list_font"><a href="/user/491208464代购/" target="_blank"><img src="http://static.tulaoshi.com/html/tulaoshi_new/images/touxiang/11.jpg" /><span>491208464代购</span></a></div>
<span class="font_span"><a class="em_s" href="javascript:;">12</a><a class="em_s2" href="javascript:;">1</a></span></div>
</div>
</li>
<li>
<div class="xiang_892_2_1"><a href="/reader/1533129" target="_blank"><img src="http://img.tulaoshi.com/201602/02/ddd5ba66750795eb15ee79956423c189_thumb_189.jpg" width="224" height="173"></a></div>
<div class="xiang_right clearfix">
<div class="xiang_right_1"><A href="http://www.tulaoshi.com/n/20160202/1533129.html" target="_blank">Photoshop制作漂亮的透明水母</A></div>
<div class="xiang_righ_lable">标签:<a href="http://www.tulaoshi.com/ps/" target="_blank">PS</a> <a href="http://www.tulaoshi.com/psjichu/" target="_blank">PS基础</a> <a href="http://www.tulaoshi.com/psxg/" target="_blank">PS效果</a></div>
<div class="span_em_123"> 水母的制作有点类似水泡的制作。重点是把水母的高光部分渲染出来,尤其是边缘的一些高光。可以用涂抹工具直接涂抹,也可以用选区来控制。 最终效果 1、制作水母的重点是主体部分的制作,需要完成的效果如下图。 图1 2、新建一个800 * 800像素的画布,选择渐变工具,颜色设置如图2,由左至右拉出图3所示的线性渐变作为背景色。 图2 图3 3、新建一个组,用钢笔勾出水母的...<a href="http://www.tulaoshi.com/n/20160202/1533129.html" target="_blank">[ 查看全文 ]</a></div>
<div class="span_em ">
<div class="cai_list_font"><a href="/user/山野晴人/" target="_blank"><img src="http://static.tulaoshi.com/html/tulaoshi_new/images/touxiang/9.jpg" /><span>山野晴人</span></a></div>
<span class="font_span"><a class="em_s" href="javascript:;">14</a><a class="em_s2" href="javascript:;">1</a></span></div>
</div>
</li>
<li>
<div class="xiang_892_2_1"><a href="/reader/1526802" target="_blank"><img src="http://img.tulaoshi.com/201602/01/865588c7dd4a19dd7eb9919afe1a048a_thumb_189.jpg" width="224" height="173"></a></div>
<div class="xiang_right clearfix">
<div class="xiang_right_1"><A href="http://www.tulaoshi.com/n/20160201/1526802.html" target="_blank">Photoshop制作半透明的光影花朵</A></div>
<div class="span_em_123"> 光影花朵没有实物花朵那么复杂,制作的时候我们只需要把花瓣的高光部分渲染出来即可。然后把花瓣叠加在一起,会组成非常梦幻的效果。 最终效果 1、新建一个1024 * 768像素的文档,选择渐变工具,颜色设置如图1,然后由中心向边角拉出图2所示的径向渐变作为背景。 图1 图2 2、现在开始制作花瓣。新建一个组,用钢笔勾出第一片花瓣的轮廓,转为选区后给组添加图层蒙版。确定后...<a href="http://www.tulaoshi.com/n/20160201/1526802.html" target="_blank">[ 查看全文 ]</a></div>
<div class="span_em ">
<div class="cai_list_font"><a href="/user/沈阳都市圈/" target="_blank"><img src="http://static.tulaoshi.com/html/tulaoshi_new/images/touxiang/12.jpg" /><span>沈阳都市圈</span></a></div>
<span class="font_span"><a class="em_s" href="javascript:;">2</a><a class="em_s2" href="javascript:;">1</a></span></div>
</div>
</li>
<li>
<div class="xiang_892_2_1"><a href="/reader/1515613" target="_blank"><img src="http://img.tulaoshi.com/201601/30/386fbed5fd5bf8cacf108dcdf07ae278_thumb_189.jpg" width="224" height="173"></a></div>
<div class="xiang_right clearfix">
<div class="xiang_right_1"><A href="http://www.tulaoshi.com/n/20160130/1515613.html" target="_blank">PHOTOSHOP应用 抠透明伞教程</A></div>
<div class="xiang_righ_lable">标签:<a href="http://www.tulaoshi.com/ps/" target="_blank">PS</a> <a href="http://www.tulaoshi.com/psjiaocheng/" target="_blank">PS教程</a></div>
<div class="span_em_123"> screen.width-250) window.open(](http://img.jcwcn.com/attachment/portal/2007-1/12/44804/20060710110519606.jpg) 这是原图 screen.width-250) window.open('/yszz/UploadFiles/200607/20060710110523711.jpg');" src="http://img.jcwcn.com/atta...[ 查看全文 ]
这是原图 screen.width-250) window.open('/yszz/UploadFiles/200607/20060710110523711.jpg');" src="http://img.jcwcn.com/atta...[ 查看全文 ]
本教程介绍半透明丝绸效果的制作方法。思路:先用钢笔及其他图形制作出优美的曲线条,然后定义成画笔。再设置好画笔的属性,应用到路径里面就可以了。本教程还有其它的制作方法。您可以参考教程: 巧用路径制作漂亮的彩色飘带 最终效果 第一步:新建一个文件,大小自定,用灰色(#cccccc)填充背景层,如下图所示。 第二步:新建图层,在工具箱中选择【钢笔工具】,在【图层1】中绘制如【图02】所示...[ 查看全文 ]
透明花朵制作并没有实物花朵那么复杂。我们只需要渲染花瓣主要的高光部分,如中间及边缘的一些高光,其它细节并不需要刻画。 最终效果 1、先来把花朵分解一下,主要由花瓣及花蕊勾出,如图1,2。 图1 图2 2、新建一个1000 * 800像素的文件,背景填充暗紫色:#873AB0。先来制作花瓣,第一片花瓣需要完成的效果如下图。 图3 3、新建一个组,用钢笔勾出第一片花瓣的轮廓...[ 查看全文 ]
最终效果 1、打开下图所示的相框素材,把背景图层复制一层。 2、打开下图所示的素材图片,拖进来,按Ctrl + T适当改变相框的大小。 3、回到背景图层,选择菜单:编辑 填充,然后选择木纹图案填充(木纹图案为系统自带图案,如果找不到可以选择复位图案)。 4、新建一个图层,选择一款文字画笔笔刷上,设置画笔图层样式,参数设置如下图。 5、选择文字工具,输入想要的文...[ 查看全文 ]
本教程介绍透明的物体制作方法。杯子本身是透明度,只能用一些高光来体现杯子形体。制作的时候重点在高光部分的制作。作者没有详细的介绍高光制作的方法,很多细节需要自己慢慢去领会。 最终效果 1、新建一个大小适当的文件,背景填充黑色,然后用钢笔工具抠出杯子的路径,机构不是很多可以分开来勾,然后填充白色,效果如下图。 2、分图层填充实体,注意用白色,教程为了方便填充了其他颜色。 3...[ 查看全文 ]


